
Showing posts with label Hairs Fashion. Show all posts
Showing posts with label Hairs Fashion. Show all posts
Friday, January 17, 2014

The Dutch Braid Crown Hair Style
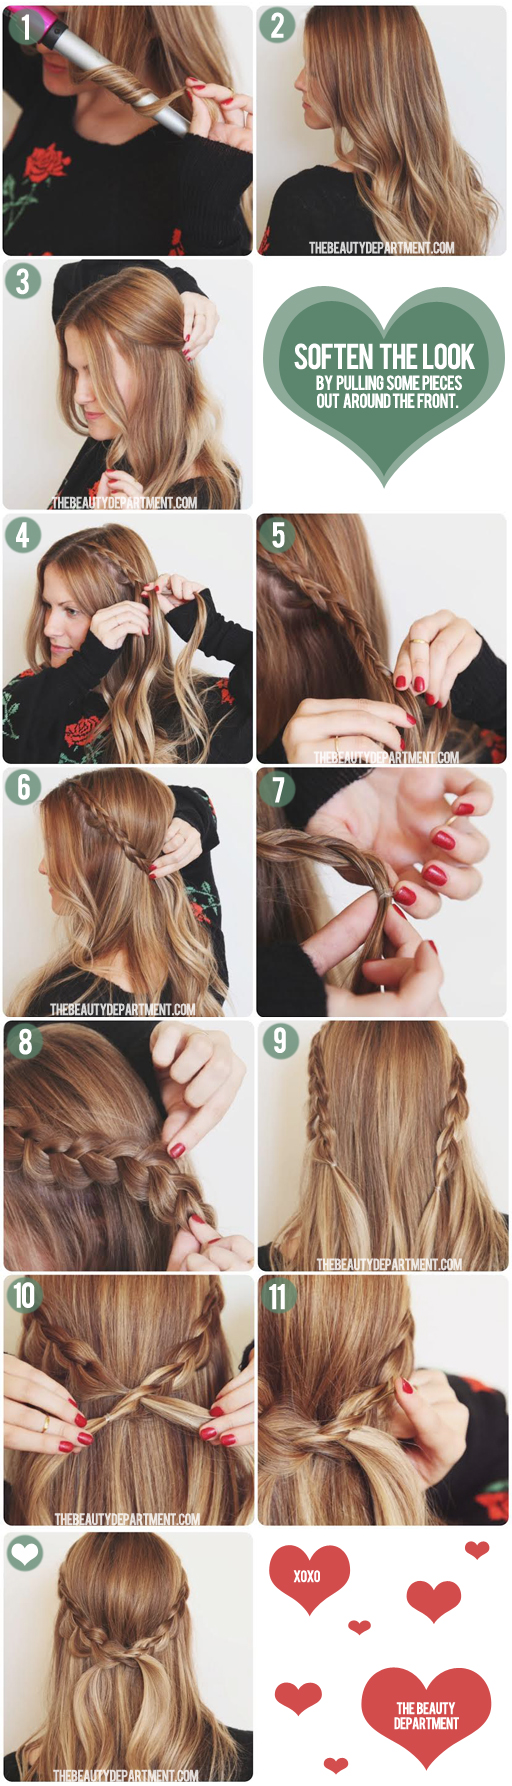
- Start with a little wave in your hair. We used this wand to get perfect waves (bonus… that wand is wayyyy less expensive than most and we love it!) If you already have natural wave, you’re good to go. (Curly girls can do this as well! Just skip by #2)
- This is about the amount of wave you should have. Not too perfect, just quick, subtle waves.
- Pull half of your hair back where you imagine the braid going and then gently pull some of your fringe/bang area out to soften the look. Better to pull those pieces out now than once you’ve already braided them in!
- Start the dutch braid from the part and going down toward your ear. Don’t worry about scalp showing. We’ll take care of that in step 8.
- Once you get just above the ear, start doing a regular 3 strand braid.
- Make sure you braid it far enough so it will reach the back/middle of your head. For this look, I wanted the hair to go under the occipital bone which is that little bone on the back of your head. Right below it there’s a curve and that’s where you’re going to want to secure this braid, so make sure it reaches there.
- Now tie it off using a small clear elastic.
- Fatten up the braid by gently pulling it apart. Bulking up the braid will hide any unwanted scalp showing up front.
- Do exactly the same thing on the other side.
- Pull the braids together to meet in the back. Weave one of the braids through the other one.
- Pin it below the occipital bone using a couple of bobby pins.
The Fun Bun Hair Style
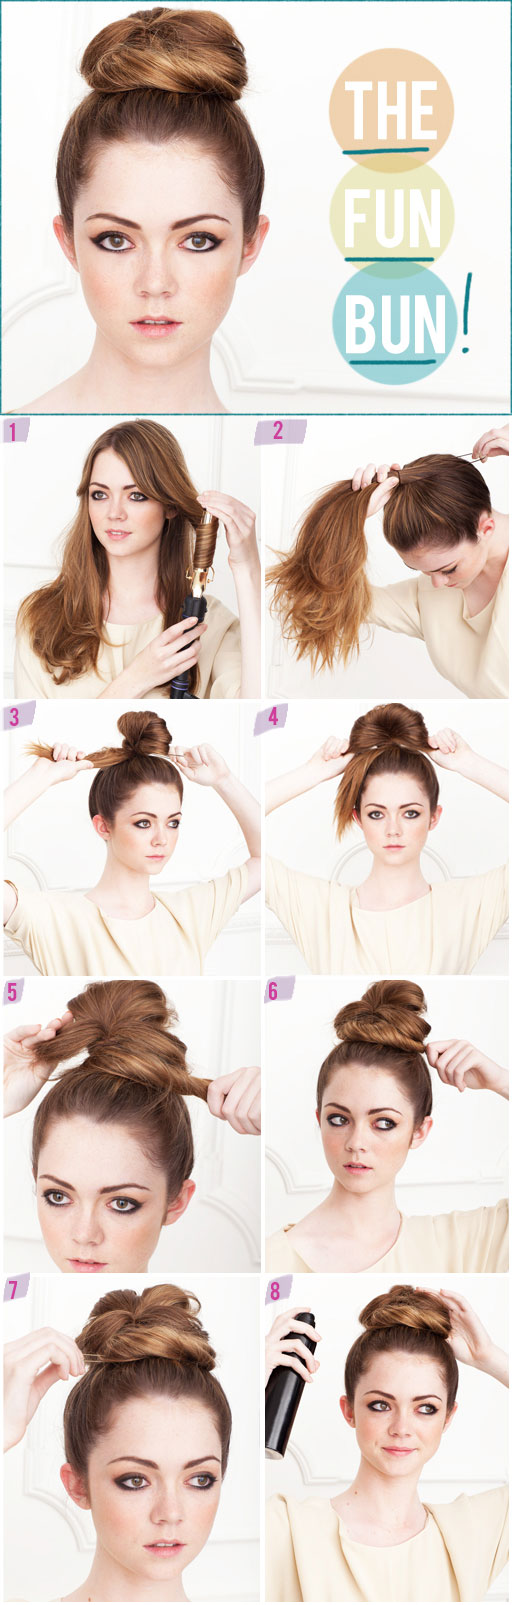
Step 1: If your hair is straight, use a 1″ curling iron to curl
everything under. This will make it easier to tuck pieces into the bun.
When they’re straight, they tend to pop out more. If you have wave or
curl you can skip this step if you want to.
Step 2: Flip your hair over and gather everything into a ponytail on
top of you head, securing it with an elastic ponytail holder.
Step 3: On the last time around with the ponytail holder, only pull the ponytail through half way.
Step 4: Take the loop you’ve created and spread it out. Don’t over think it. Just widen it and allow it to be somewhat messy.
Step 5: Take the tail end and wrap it around the ponytail base.
Step 6: Pin the end of the ponytail to the base using a couple of hair pins/bobby pins.
Step 7: Gently pull on pieces and then pin them. This will give your top-knot a slightly more messy texture.
Step 8: Spray a veil of medium hold hairspray all over. Don’t smooth
down all of the fly aways, just lightly tuck the pieces that have gone
rogue!
Romantic Side Braid Hair Style

1) Create a deep side part and pull all hair to the opposite side.
2) Begin a regular French braid at the top, near the part.
3) Continue creating the French braid along the side/hairline moving towards the ear.
4+5) Add hair from the opposite side by taking horizontal sections
and bringing them around to the front where the braid is located.
6) Continue taking even sections to add to both sides of the braid, making sure the braid remains located along the hairline.
7) Once you have placed all the loose hair into the braid, continue braiding the tail and secure with a clear rubber band.
8) Spray with finishing spray.
9) Loosen braid to desired size.
A Tutorial on Long Hair Wedding Hair Updos

1. Take a 1 inch thick piece of hair in your hands and twist it. 2. Hold
one tiny strand at the top and push the remaining hair up into a
ringlet on your head. 3. Wrap the remaining strand around the ringlet
and use a bobby pin to pin the ringlet to your head 3. To recreate the
top image, grab a friend who can help you create and pin ringlets all
the way around.
Half Up Half Down Wedding Hairstyles

Instructions
1. Start with loose waves in your hair.
2. Backcomb or tease the hair at the crown of your head.
3. Smooth out the top layer.
4. Twist one side of your hair and ***pin it about 2/3 of the way
across your head*** (this is the big trick that will allow you to hide
your tracks!)
5. Now twist the other side and tuck it under the first part.
6. Again, pin that piece about 2/3 of the way across your head.
Easy! And so pretty!
Wedding Hairstyles with Drop Veil Hair Style

Finding the right wedding hairstyle under your veil can be a
tricky prospect, particularly if you’re wearing a drop veil (which we
love). For any of you who have already tried on a drop veil, you know
the challenge: the veil kind of flattens your hair which can be bad news
for many hairstyles. With a drop veil you’ve got to find a wedding
hairstyle with a low profile. The example above gives you the low
profile plus some nice interest. I think it walks a nice line between
vintage-glam and a relaxed modern look. Follow the steps below to get
the look:
1. Prep your hair with a big loose curl and some hairspray to give it some body and texture.
2. Section your hair into three parts: two “wings” in the front
(imagine you’re wearing a headband–the hair in front of the headband
should go into the wings and the hair that would be behind the headband
should go into the ponytail) and then pull the rest into a low pony.
3. Do a little topsy-tail.
4. Do another topsy-tail in the same place but this time only pull it halfway through.
5. Pin the halved ponytail out slightly wider than it would fall naturally.
6. Pin any extra length of hair back up onto the front of the roll of hair.
7. Using a deep side part, pin the two front sections of hair into
waves that meet at the top of the roll of hair in the back. Secure
temporarily with bobby pins and spray with plenty of hair spray as shown
in the final picture. When the hair spray is dry gently remove the
bobby pins from the front and sides and the waves will stay right where
you put them.
Crown Braid Chignon Hair Style

1. French braid front section of hair from one ear to the other. Leave end of braid out until Step 7.
2. Take the top section of hair, tease it and pin securely with bobby pins creating a half up – half down look.
3. Then starting on one side of the hair take a section of hair,
twist it and bring it the opposite side and pin it with bobby pins. Make
sure to cover the previously secured bobby pins from Step 1.
4. + 5. Then take the remaining “tail” from the section of hair just
pinned with an additional section of hair, creating one section of hair,
twist and bring it the opposite side and pin securely with bobby pins
directly under the previous twist.
6. Repeat the process until there is no longer any more sections on either side and you are left with just the “tails”.
7. + 8. Pin the remaining “tails” by twisting and overlapping, mimicking the overlap twist look.
9. + 10. After all hair is twisted and pinned, bring the braid into
the back and secure with bobby pins. Making the “tail” of the braid
mimic the already pinned twists.
11. After all is hair and braid is pinned securely, gently tug at hair creating a looser more full look.
Elegant Fishtail Bun Hair Style

1. Gather all hair at the crown of the head.
2. Tie with a sturdy hair elastic and place a hair donut or a
scrunchie (we just used a thick head band and doubled it over) at the
base of the pony to give it extra volume.
3. Pull about 1/4 of the hair out from underneath the scrunchie and fishtail braid.
4&5. Tease the remaining hair in the pony.
6. Take the teased hair and slightly twist as you wrap the pony
around the scrunchie. This will give a central, fountain-like look to
the bun, similar to a sock-bun. Bobby pin at the base the whole way
around the bun to secure a strong hold.
7. Take your fingers and pull apart your fishtail braid until it is a looser weave.
8. Wrap your fishtail around the base of the bun and tuck the
remaining end under the braid, securing with one or two bobby pins.
9. Put on your best dress and that bright red lipstick you love! :)
Thursday, January 16, 2014
French Braid Bun Hair style

1. Part hair.
2. Grab a small section of hair.
3. & 4. Split into 3 parts.
5. Start French braiding, making sure to braid diagonally across the head.
6. Secure braid with a hair tie.
7. Roll the braid up and in, making a little bun.
8.Secure bun next to or above ear with Bobbi pins.
Fishtail Braid Hair Style

1. Backcomb/tease the crown of your head. This makes the hair “sticky” for starting the fishtail.
2. Gather a small handful of hair from the back center of the head and separate the hair into two sections.
3. + 4. Take a small strand of hair from the right section, pull it back and cross it over to join the left hair section.
5. + 6. Take a small strand of hair from the left section, pull it back and cross it over to join the right hair section.
7. Repeat these steps all the way down the back of the head. Continue throughout the “tail”.
8. Secure with hair tie. Fishtails looks beautiful a little
disheveled. To achieve this look gently pull apart/loosen the braid.
It’s ok if it’s uneven or little pieces falls out. Gives the fishtail a
youthful, messy ease.
Knotted Chignon Wedding Hair Style

1. Pull hair into a low pony tail.
2. Section hair into two parts: about one third in one section and two thirds in the other.
3. Twist the larger section into a bun and secure with bobby pins.
4. Smooth out the smaller section and pull it up loosely over the
bun–secure the middle of that section to the top/base of the bun leaving
the tail loose.
5. Separate the tail into two equal sized sections and tie them
together once like you would at the beginning of tying a bow or shoe
lace.
6. Wrap around and pin down the rest of those tails underneath the bun.
Crown Braid Hair Style

1. Part hair down middle. Secure one side of the hair with a clip or elastic so it doesn’t get mixed in with the other side.
2. Grab a section of hair at the nape of the neck. Split into three.
3. Start to do an INSIDE-OUT French braid (instead of crossing sections over each other, cross under).
4+5. Continue braiding inside-out, wrapping around the side of the head.
6. You’ll cross the forehead and finish the braid. Secure with a hair tie. Let braid hang whilst you braid the second side.
7. Grab a section of hair at the top of the head and split into three.
8. Start to do an INSIDE-OUT French braid down the side of the head. Finish the braid and secure with an elastic.
9. Take braid and wrap around the back of the head.
10. Secure with Bobbi pins. Tuck and hide small tail under the other
braid. Grab the braid resting on the forehead and secure with Bobbi
pins. Tuck tail under other braid.
Waterfall Braid Wedding Hairstyles for Long H

Waterfall Braid Instructions
1. Part hair on it’s natural side.
2. Grab a small piece and divide into 3 sections.
3.French braid for 2-3 inches. This will secure the “waterfall” and make sure it doesn’t fall in your face.
4. After you’ve French braided for a few inches, drop the top section of your braid. It’s ok. Let it fall.
5. Pick up a new section of hair from directly behind where you’ve
dropped the top piece. This new piece acts as a new section of your
French braid
6. Keep moving around the head. Remember, every time you grab a
section of hair from the top of your head to add to the braid, let is
drop and replace it with a new section.
7 +8. When you reach the other side of your head, secure the end of the braid with Bobbi pins.
Messy French Twist Hair Style

Instructions
1. Start by prepping the hair with Bumble and Bumble Surf Spray.
Spray generously and quickly blow dry in cold setting and dry with
fingers. We added Bumble and Bumble Dry Spun Finish to the mix to add
that airy feel to the ends.2. Take your comb and start teasing the crown section. Add a little bit of tease to the sides and lightly tease the ends as well.
3. With your fingers, lightly “comb” all the hair back as if you’re about to do a mid pony.
4. Follow through to the ends and start rolling the ends to the direction you want the twist in. We rolled to the left.
5. Keep rolling until you reach the head, this is also the part where you can “poof” out the crown a bit and loosen it up.
6. Now that you have the shape you want, go a head and pin the twist to the rest of the hair. *Pin the bobby’s as if you’re crocheting through the hair so you don’t flatten the twist. Lock it down by spraying.
Wednesday, January 8, 2014

Tuesday, December 24, 2013

Subscribe to:
Posts (Atom)